This is a guide that focuses on data-driven optimization of Revcontent campaigns.
Examples are for illustration purposes only. There is a period of “data discovery” that you will go through figuring out what your upper and lower limits on cost before making an adjustment.
Requirements to Successful Optimization
There are two cardinal items that must be setup correctly for you to succeed with Revcontent ads.
- Campaign Tracking
- Conversion Tracking (Pixel Setup)
If you don’t have these setup correctly, you are dead in the water. I cannot stress this enough, do not implement any of this without proper tracking in place and verified. Trustworthy data is the cornerstone to success.
For more information see the campaign tracking guide, & Revcontent pixel and conversion setup.
Optimization Basics
First a general rule of thumb is to apply optimizations at the campaign level; not the account level. There are certainly exceptions to this rule; however, this guide is based on campaign adjustments.
Second, we recommend allowing campaigns spend at least $10 before making any optimizations.
Third, this guide is based around cost per action “CPA” rules, such as:
- Click to landing page
- time on site
- watched % of video
- email submit
- lead generated
- Sale
- etc
Literally anything as long as you are tracking the action.
These are guidelines to get you started in the right direction, adjust according to your style, workflow and budget.
The example rules below break down into two components: action and conditions. The action is the change you want to make such as blocking a site or changing a bid. The conditions is the criteria for the action to take place.
Now let us dive in.
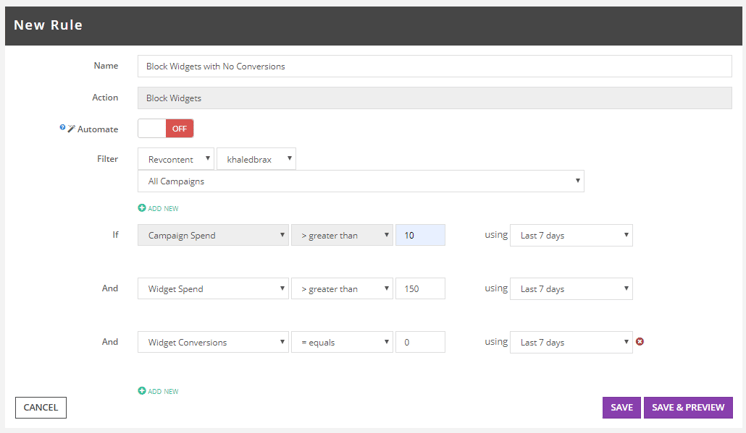
Block Widgets with No Conversions
This is the first rule I recommend to everyone; cuts the fat to instantly boost return on ad spend (ROAS).
Action: Block Widgets
Conditions: Widget Spend is greater than $150 (3 x $50 goal CPA)
& Widget conversion equals 0
Example rule in Brax
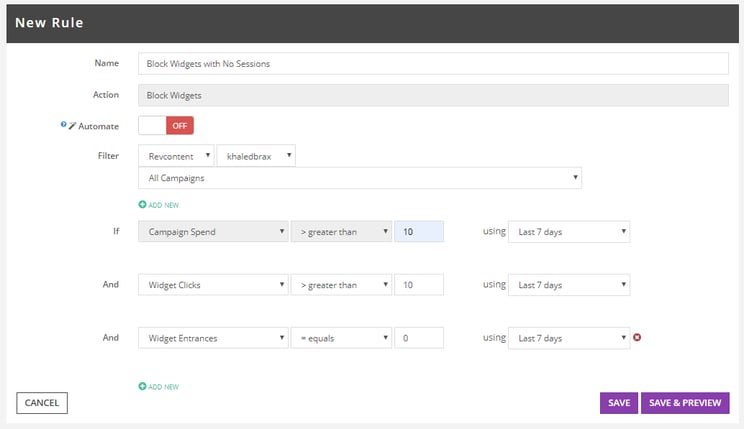
Block Widgets with No Sessions
This is a rule that basically looks for “invalid traffic” that could be anything not executing javascript such as bots, people browsing without javascript and ad block users. The key to this working is having analytics setup and an easy way to match the data back to the ad spend.
Google Analytics is great for this; even if you don’t use it for conversion tracking. Another alternative is a click tracker (Voluum, Thrive, etc) and base it on clicks from the landing page to another page. This is often called LP CTR or landing page click thru rate.
Action:
Block Widgets
Conditions:
Widget Clicks is greater than 10
& Widgets Entrances equals 0
Example rule in Brax
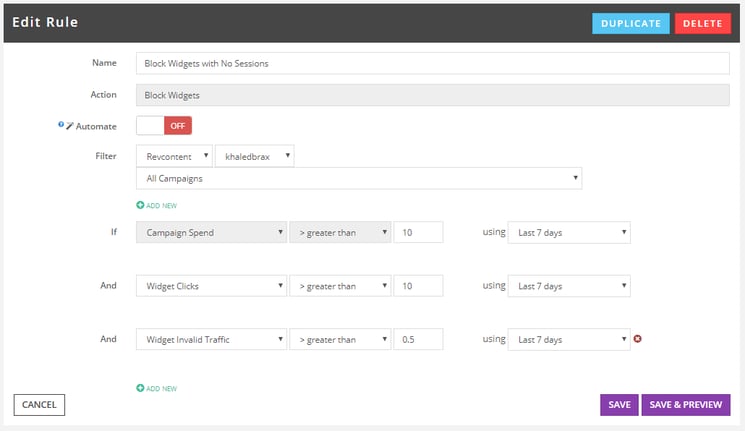
Here is an alternative approach using the calculation, invalid traffic = clicks/entrances - 1
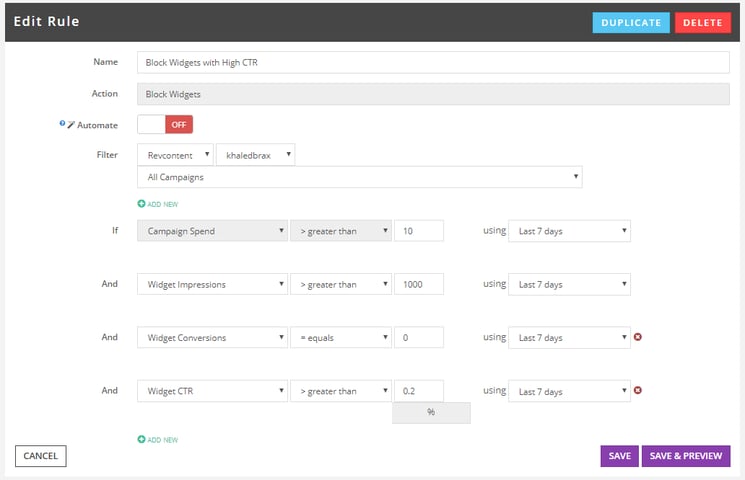
Block Widgets with High CTR
Typically the higher your CTR the better; because it helps you bid lower while still being competitive in the ad auction. The flipside is sometimes CTR is suspiciously high in the double digits; this could mean a bot is clicking on specific site placements or you have a possible hit ad creative.
Consider this an optional rule and test it heavily to get comfortable. I usually recommend aiming for an ad creative CTR of 0.50%, so the rule is looking at 20% which is 50x better. The impressions is at 1k because I don’t want something with 2 clicks on 10 impressions getting blocked because it is too early and there might be a data delay.
Action:
Block Widget
Conditions:
Widget impressions is greater than 1,000 (consider increasing)
& Widget conversions equals 0
& Widget CTR is greater than 20% (ex: 200 clicks on 1,000 impressions)
Example rule in Brax
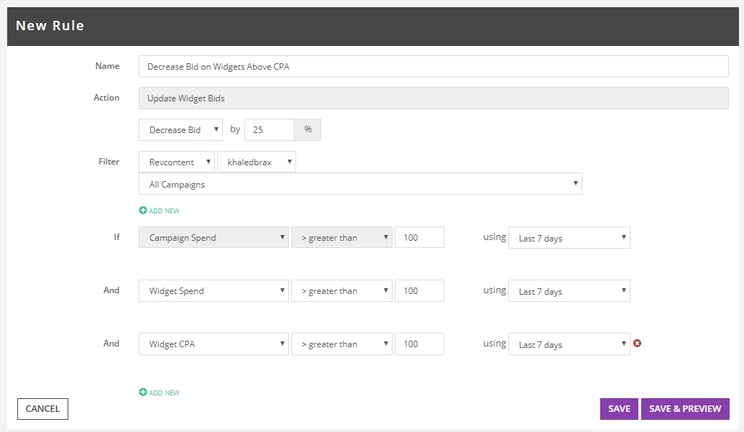
Decrease Bid on Widgets Above CPA
Before blocking a site placement completely, it is worth lowering the bid on it to see if that gets to the CPA goal. In this rule we are lowering the bid 25% after 2x the goal CPA is spent. You might also use multiple tiers (two rules) of this kind, such as, a 20% decrease after CPA goal spend, then a second rule to decrease another 20% after 2x CPA goal spend.
Action:
Update Widget bid - decrease by 25%
Conditions:
Widget spend is greater than $100 (2x $50 CPA goal) & Widget CPA is greater than $100 (2x $50 CPA goal)
Example rule in Brax
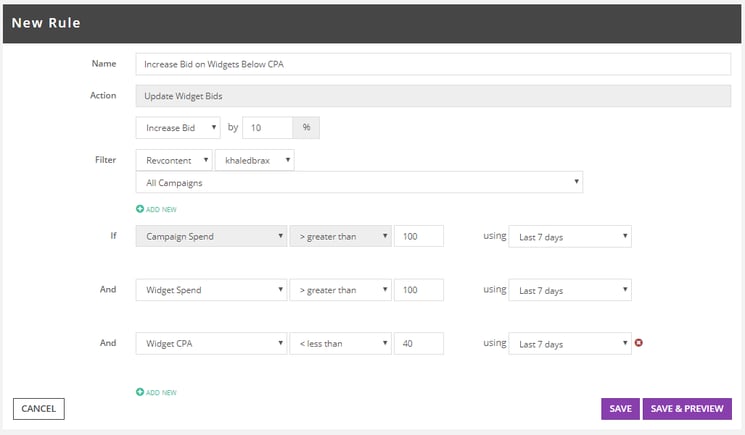
Increase Bid on Widgets Below CPA
This rule is aimed at getting more volume from a site placement that performs well by bidding slightly higher. The idea being you will be in a higher position on that publication which can subsequently increase CTR. You want to exercise caution and increase the bid slowly so a profitable placement does not turn upside down.
Action:
Increase Widget bid 10%
Conditions:
Widget spend is greater than $100 (2x $50 CPA goal)
& Widget CPA is less than $40 (20% below $50 CPA goal)
Example rule in Brax
Frequently Asked Questions
Use these rules as a starting point to streamline your campaign optimization efforts leveraging performance data.
Many of the questions don’t have a straightforward answer without insight into your business metrics so consider it general guidance. Budget is a big factor to determine how long to look back (last 7 days vs 14 days) and minimum spend before optimizing.
How many days back should I look?
I recommend at least 7 days at a minimum; with up to 30 days if your conversion window is longer and budget allows. Small budgets need longer time frames usually.
The first time you run rules, try looking back 60 and 90 days for sites that have never performed. Repeat this once a month to once per quarter.
What should my minimum spend for campaigns/ads/publishers before I pause/block/adjust?
I recommend a campaign spend of $10, ads & publisher spend of $5 at a minimum. You should have a CPA goal (or similar replacement) and base it on 3x the cpa goal. For example, a $10 cpa goal uses a minimum of $30 for campaigns/ads/publishers before adjusting. The common exceptions are obvious fraud or poor performance.
How often should I run a rule?
This really depends on how much you are spending; because a small budget won’t have enough new data each day. On the other hand, spending thousands per day may warrant running every day.
A good rule of thumb is once a day to catch new placements that need blocked and once a week for bid adjustment rules.
Final Thoughts
Usually the best approach to Revcontent ad optimization is to start with a manual process to work out the kinks. Then progress to a more automated process.
If you have not done the optimization manually yet, automating it will likely make a mess.
Make your operation efficient with the rules above. Once you have defined, tested and trust rules then you are ready to automate.

