We are going to quickly show you how to set up tracking in Voluum to work with Google Analytics & Outbrain, Taboola, Revcontent, Gemini (Yahoo/Oath) and Content.Ad
To sync Google Analytics with these networks & optimize efficently you will want to pass in these parameters:
- Source
- Campaign
- Publisher (or Site or Widget)
- Section (or Target)
- Ad (or Content)
We will be passing them into Google Analytics (GA) utm parameters.
- utm_source
- utm_campaign
- utm_medium
- utm_term
- utm_content
Then into Voluum using advanced parameters
- Variable 6
- Variable 7
- Variable 8
- Variable 9
- Variable 10
Each network uses different names for these parameters, to see what each one is by network, read this blog post: https://brax.io/campaign-tagging-content-distribution/
Now lets talk about the structure of a Voluum and the campaign link.
First off if you are not familiar with Voluum, I would suggest you spend sometime and read this: https://help.voluum.com/userguide.
It is important you read the user guide and understand Voluum beginning to end to be successful. RTFM!
The main goal is to pass the above variables into Voluum using the campaign URL; Brax, Google Analytics & Voluum does the rest.
Step 1: Set up the tracking parameters in the traffic source in Voluum.
You should have each source you are buying traffic from added in Voluum. If you do not, RTFM.
When adding or editing a traffic source in Voluum, you should have the option to set advanced parameters. This is where you will put the name, the parameter for them and its placeholder. We will be using. Here is a screenshot of what this looks like:
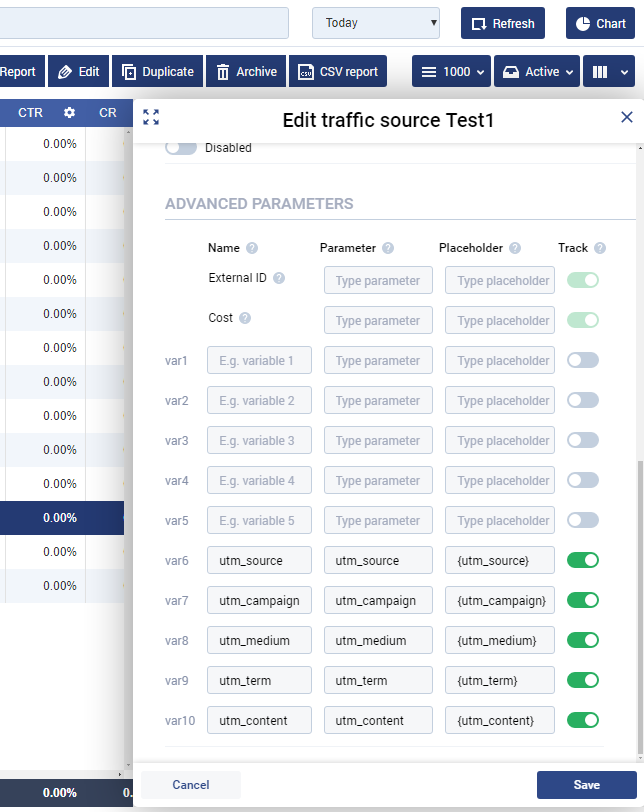
Noticed we used var 6,7,8,9,10. You can use any that are not already in use.
Set this up for Outbrain, Taboola, Gemini, Revcontent & Content.Ad as traffic sources in Voluum.
Step 2: Set up the offer URL in Voluum to pass the parameters to Google Analytics.
Now we need those parameters that we put in the traffic source settings to be passed to the URL when the offer page loads so Google Analytics can collect them. To do this we will need to add them to the end of the offer URL.
You can see we are taking the different utm parameters and putting the variable names we set in the traffic source into them. Here is a screenshot:
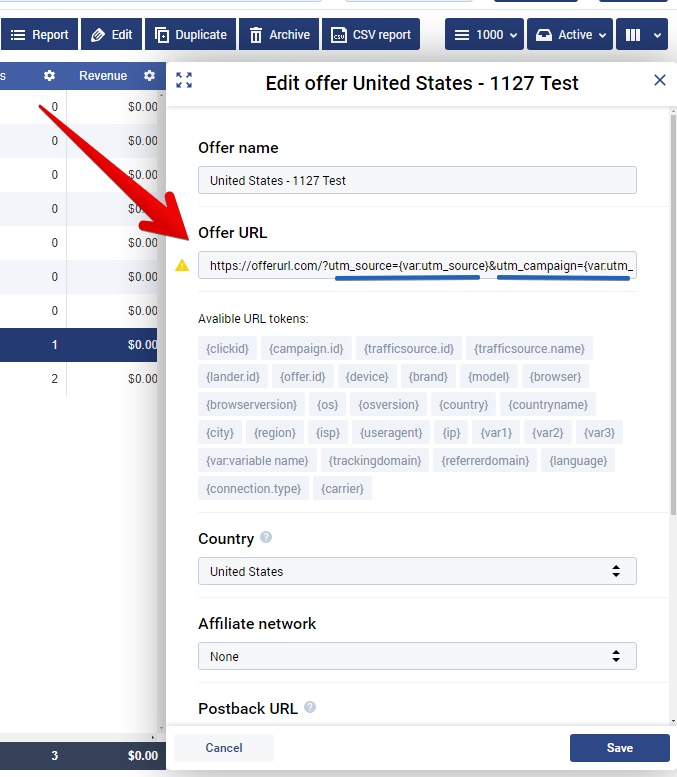
You can do this by creating/editing an offer in Voluum.
Here is an example URL you can copy and paste:
https://offerurl.com/?utm_source={var:utm_source}&utm_campaign={var:utm_campaign}&utm_medium={var:utm_medium}&utm_term={var:utm_term}&utm_content={var:utm_content}
Hit save after completing.
Step 3: Set the parameters up in each traffic source campaign & ad settings.
Now that we have Voluum set up (and Google Analytics should be on your pages). We need to have the ad networks (traffic sources) populate that information.
Go the campaigns section of your Voluum software. When editing a campaign, you should see the option to copy your campaign URL. Here is an example:
http://64hhdgfd.voluumtrk.com/8ba27b40-d5f2-49e8-a46d-e85c661bcae9?utm_source={utm_source}&utm_campaign={utm_campaign}&utm_medium={utm_medium}&utm_term={utm_term}&utm_content={utm_content}
Copy this link, we will take parts of this URL and paste it in the proper settings for each network.
To make things easier, I have included what parts should go in which settings by each network.
CAMPAIGN Level Tagging:
{% raw %}Outbrain: utm_campaign={{CAMPAIGN}}&utm_source=outbrain&utm_medium={{publisher_id}}&utm_term={{section_id}}
Taboola: utm_campaign={{CAMPAIGN}}&utm_source=taboola&utm_medium={site}
Revcontent: utm_campaign={{CAMPAIGN}}&utm_source=revcontent&utm_medium={WIDGET_ID}&utm_term={ADV_TARGETS}
Content.ad: utm_campaign={{CAMPAIGN}}&utm_source=contentad&utm_medium=[did]
*note: Yahoo only supports tagging at the ad level, see below for more information
AD Level Tagging:
Outbrain: utm_content={{AD_ID}}
Taboola: utm_content={{AD_ID}}
Revcontent: utm_content={{AD_ID}}
Content.ad: utm_content={{AD_ID}}
Yahoo: utm_campaign={{CAMPAIGN}}&utm_source=yahoo&utm_medium=${pubid}&utm_content={{AD_ID}}
Setting the parameters exactly as above is important. Each term is Case Sensitive.
IMPORTANT: Now when entering a URL in Brax when creating ads, you do not need to include those tracking parameters. You will only need the bolded part of the URL, the underlined part will be added automatically:
http://64hhdgfd.voluumtrk.com/8ba27b40-d5f2-49e8-a46d-e85c661bcae9?utm_source={utm_source}&utm_campaign={utm_campaign}&utm_medium={utm_medium}&utm_term={utm_term}&utm_content={utm_content}
Step 4: Test if the URL is loading properly.
To be sure this is working properly, simply take the URL from step 2 and pre-populate some data into and load the page.
Then do a test conversion by going through the path.
Load your reports in Google Analytics and Voluum reports and you can see that this information is now in both reports.
Now you can launch campaigns & ads, and Brax will take care of the rest!
Additional notes:
- You can use non-UTM tracking if you are not using Google Analytics. As long as you are updating the URL to match you will be fine.
- You do not have to use Brax to follow these instructions, even though you would be at a disadvantage. You can simply put the URLs right in the networks.
{% endraw %}

