So, you have signed up for Brax and your team is creating content at lightning speed. Things seemingly could not get any better, yet your heart longs for even more automation, power, and domination.
Enter: the Brax Marketing API.
Now unleash your development team on the API to leverage even more time-saving benefits than before by implementing custom logic that supports your business needs.
This post is going to cover the following topics to ensure your team can begin enjoying even more benefits of a partnership with Brax:
- Enabling API access for your account
- Installing and configuring Postman
- Authenticating
- Fetching a list of accounts
- Additional API parameters
- Fetching campaign reports for an account
- Next Steps
We will be using Postman and the Brax Marketing API Documentation in this guide.
Review the documentation to understand the available calls, features, and limits of the API.
Postman makes working with APIs a joy and we want to extend that joy to you and your team. We created a predefined collection of requests that makes it simple to get started.
Enabling API access for your account
First, you must have an active Brax account. If you do not have one yet, get your free trial today.
Second, request API access for your account by emailing api@brax.io. Include the e-mail address used to create your Brax account.
Once enabled, log into Brax, click your email address at the top right corner and select Profile to find your username.
.png?width=596&name=Edit%20Profile%20-%20Google%20Chrome%202020-09-08%2019.33.56%20(1).png)
We will be using your Brax username and password to authenticate.
Installing and configuring Postman
Visit the Brax API documentation and click the Postman link on the left menu, then click Run in Postman.
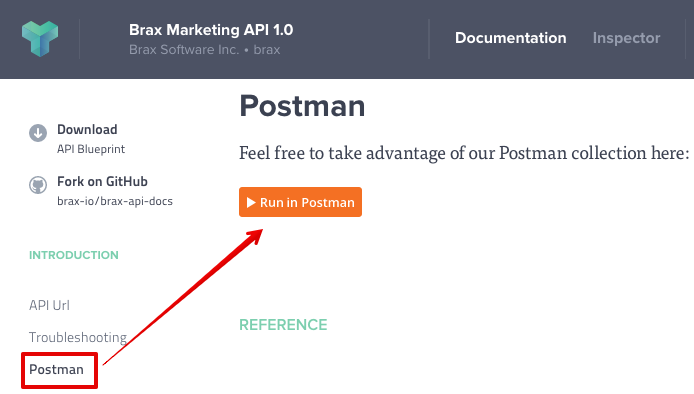
This will open up our predefined collection in your browser and will prompt you to install Postman as a Chrome application, or redirect you to download the Postman application for your operating system.
Once installed it should launch with a collection named Brax Console API 1.0; additionally, we have included an environment file by the same name which has a single predefined parameter: .
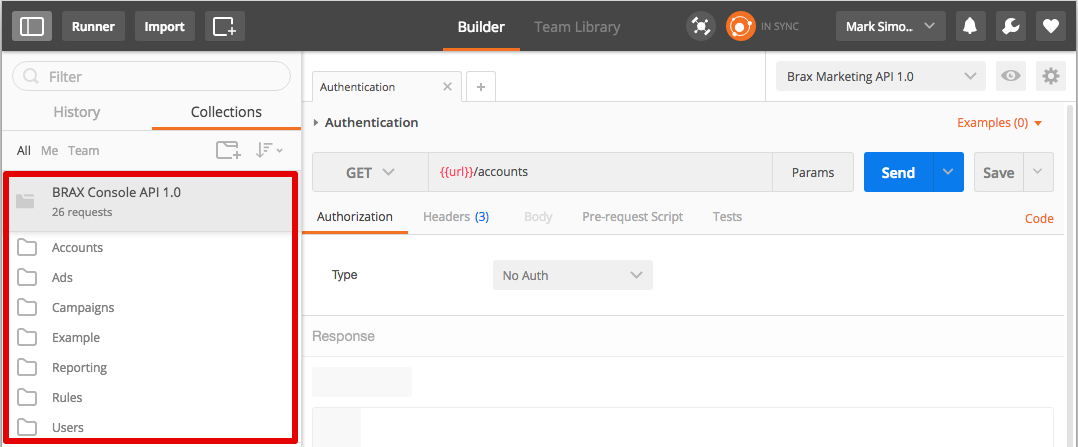
Authenticating
All requests must have an Authorization header with the value: Basic to authenticate access to Brax Marketing API.
Expand the first folder Accounts to reveal the Accounts request. This is the first request you must run to get a list of accounts for your user.
Since you have not defined the variable yet all request attempts will fail. The token is simply your username:password string which has been base64 encoded--we will generate this token now.
Generating base64 encoded token
- Click the Accounts request, there is a tab entitled Authorization
- Select Basic Auth as the Type
- Input your Brax username and password
- Click Update Request
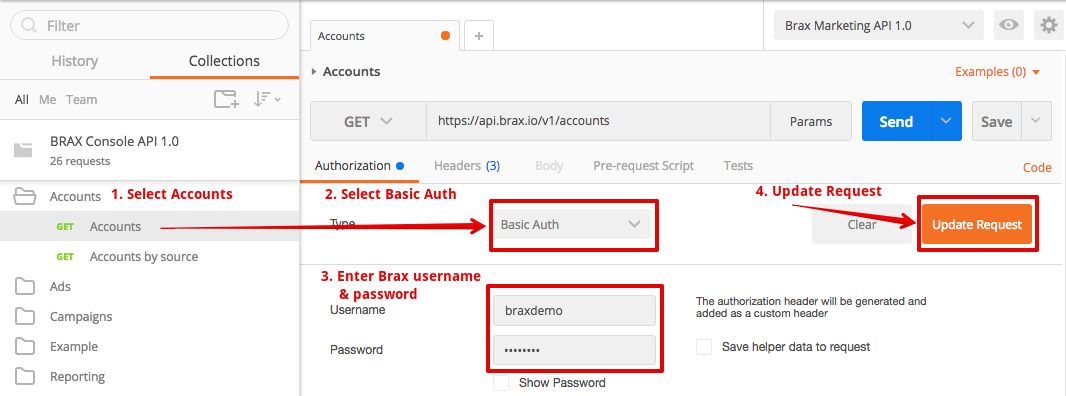
Notice that your Headers tab now has a new value for the key named Authorization, specifically: Basic .
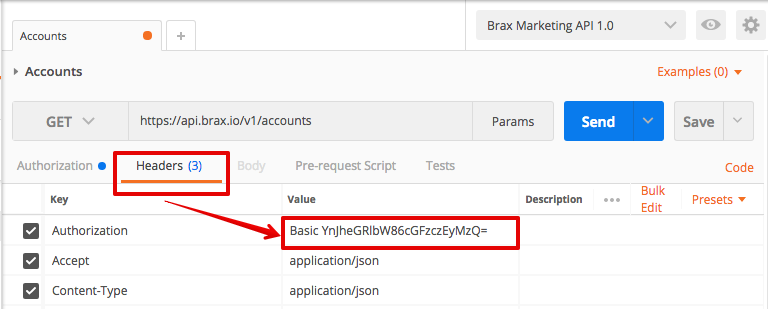
Updating Postman environment variable
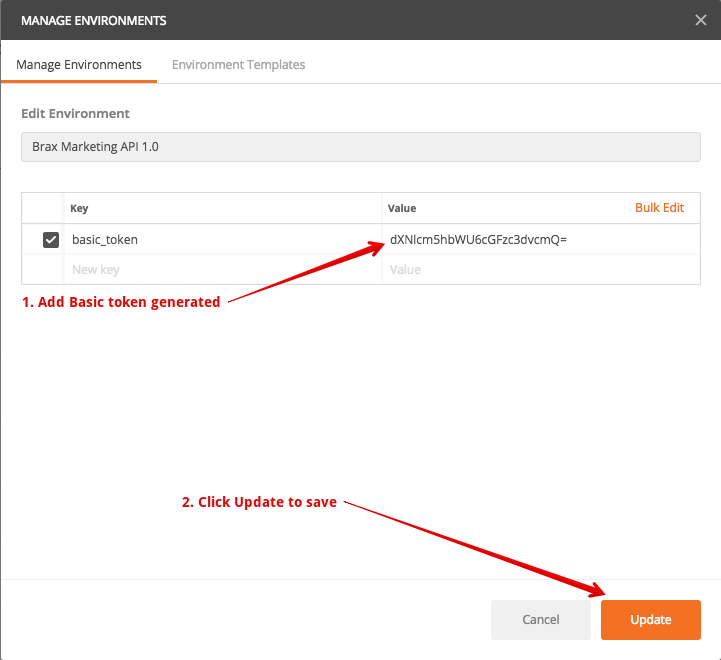
Now that you have generated your token; update the environment variable: to the generated base64 token. It should look something like this: YnJheGRlbW86cGFzczEyMzQ=.
Copy your token from the request; you will need this in the next step.
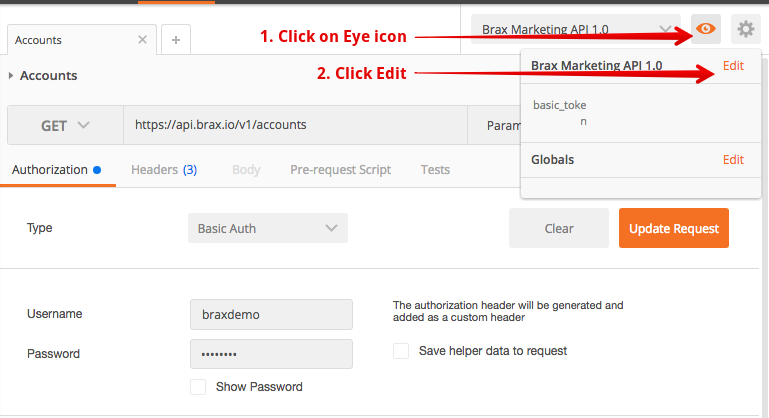
To update environment variables, refer to the top right of your Postman application where there is an eye icon, beside the environment name.
Click on the eye icon then click edit to update the environment:
Replace the default value of , currently empty, with your newly generated token.
Update Request Header to use variable in Authorization
Once your environment has been updated, return to your Accounts window, click Headers and replace the value for Authorization with the following: Basic .
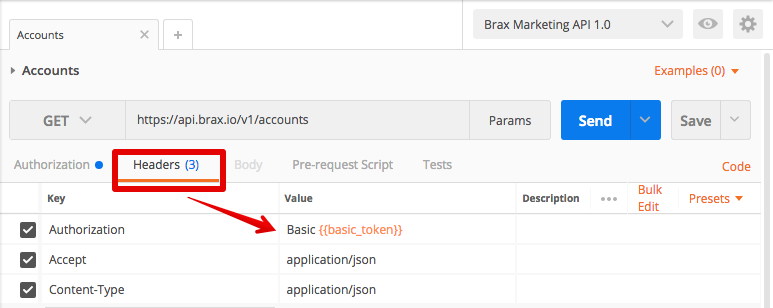
Now every request will use this value for its token--the environment variable steps are not required; however, it will save you from having to re-type your password on every request. If you would like to learn more about Postman environment variables; review this post.
Troubleshooting
If you are having trouble authenticating; there are two expected error responses:
401 response = the username, password, or both do not match your Brax login. This is usally caused by using an email instead of username. Check to make sure you are using a Brax username.
403 response = your Brax account does not have API access. Email api@brax.io for access.
If you have made it this far, congratulations! The most difficult part is complete.
Fetching a list of accounts
With Postman installed and authentication out of the way, lets have some fun. Click on the Accounts group, then the Accounts request, then click Send

Your response should look something like this:
 {
 "results": [
 {
 "id": "123",
 "source_account_id": "e010f3346de2e41fed1a288a3ba5cd5e29",
 "name": "Selfserve_brax",
 "source": "outbrain",
 "created_at": "2016-01-01T01:14:23+00:00",
 "updated_at": "2017-05-08T21:47:21+00:00"
 },
 {
 "id": "129",
 "source_account_id": "brax",
 "name": "Brax Software",
 "source": "revcontent",
 "created_at": "2016-01-01T02:50:16+00:00",
 "updated_at": "2017-05-10T04:02:24+00:00"
 }
 ],
 "pagination": {
 "offset": 0,
 "limit": 100,
 "count": 2,
 "total": 2
 }
 }
Pay special attention to the following fields: source and source_account_id.
These are going to be used heavily in many other API calls so keep them handy.
Additional API parameters
There are additional, helpful parameters which can be passed into most requests for pagination are:
- limit
- offset
Many reporting endpoints will contain the following parameters:
- source
- source_account_id
- source_campaign_id
- start_date
- end_date
A couple of notes about the above: any time you see source_{x}_id it indicates that it is an id which is provided by one of our partners and is unique to their systems. In the Brax Marketing API we require a source and a source_account_id for many requests to be unique.
Example endpoints which take advantage of these might look like these:
 https://api.brax.io/v1/accounts?source=outbrain&limit=5
 https://api.brax.io/v1/accounts?source=outbrain&limit=10&offset=5
Fetching campaign reports for an account
Now that you have mastered fetching accounts it should be trivial to proceed to viewing campaign reports, which is a good entry point for the Brax Marketing API reporting endpoints.
Using the values from the account fetching step, make a request for your campaign report. Youll need values for source and source_account_id to make this request.
Click on the Reporting group in Postman to expand, then select the Campaigns request to get started.
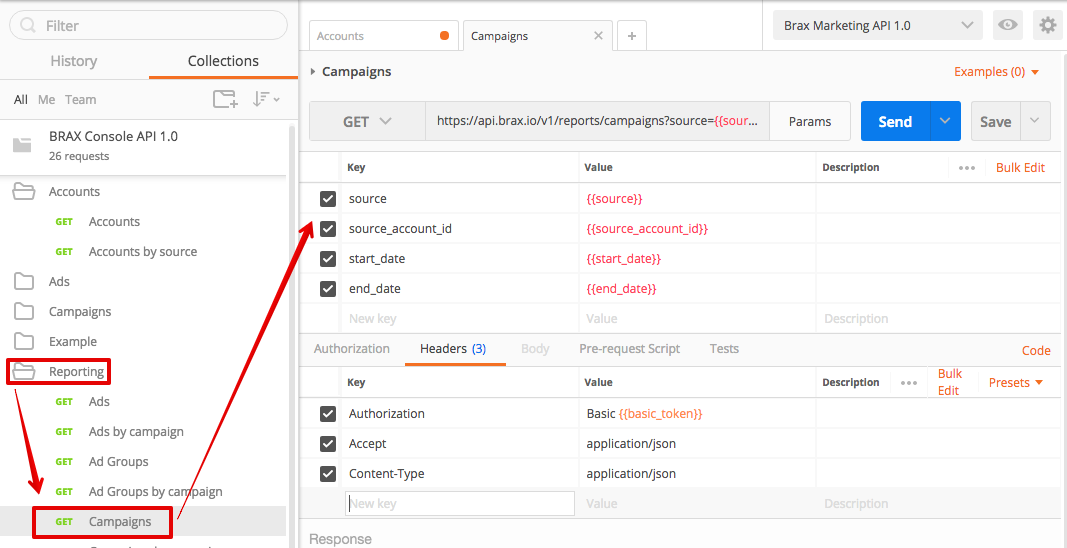
You will have a url, such as the following:
https://api.brax.io/v1/reports/campaigns?source=&source_account_id=&start_date=&end_date=
To make editing the parameters easy, click Params, to expand a table list view.
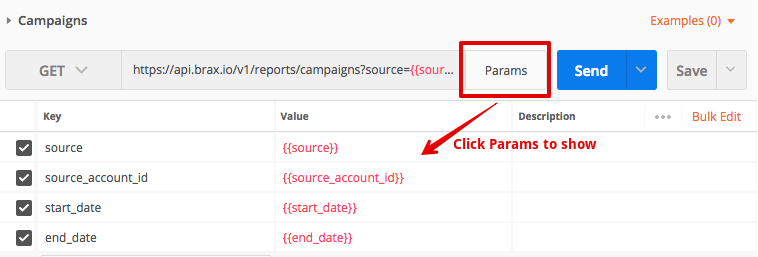
Feel free to remove start_date and end_date for the time being since they default to yesterday when they are left out; now we should have something like this:
https://api.brax.io/v1/reports/campaigns?source=&source_account_id=
Now, simply replace:
With values from the accounts request made previously.
You should have something like this:
https://api.brax.io/v1/reports/campaigns?source=outbrain&source_account_id=e010f3346de2e41fed1a288a3ba5cd5e29
You should now be able to click Send and see a response such as this:
 {
 "results": [
 {
 "source_account_id": "e010f3346de2e41fed1a288a3ba5cd5e29",
 "source_campaign_id": "12345",
 "name": "Test Campaign 1",
 "ctr": "0.0055",
 "ecpc": "0.0210",
 "cost": "2.4230",
 "cpa": "2.5200",
 "icr": "0.000149",
 "impressions": 17,
 "clicks": 121,
 "conversions": 1,
 "sessions": null,
 "pageviews": null,
 "pageviews_per_session": null,
 "bounce_rate": null,
 "avg_session_duration": null,
 "goal_1_completions": null,
 "goal_2_completions": null
 },
 {
 "source_account_id": "e010f3346de2e41fed1a288a3ba5cd5e29",
 "source_campaign_id": "12347",
 "name": "Test Campaign 3",
 "ctr": "0.0059",
 "ecpc": "0.0200",
 "cost": "2.4200",
 "cpa": "2.4200",
 "icr": "0.000049",
 "impressions": 517,
 "clicks": 125,
 "conversions": 3,
 "sessions": null,
 "pageviews": null,
 "pageviews_per_session": null,
 "bounce_rate": null,
 "avg_session_duration": null,
 "goal_1_completions": null,
 "goal_2_completions": null
 }
 ],
 "pagination": {
 "offset": 0,
 "limit": 100,
 "count": 2,
 "total": 2
 }
 }
Congratulations, you have just requested your first campaign report from Brax! This is truly a cause for celebration.
Next Steps
While this is hardly comprehensive, our aim is to help get you started on your journey with the Brax Marketing API. Go ahead, try out the rest of the API and see how you like it.
We hope this introduction has provided you with enough information to begin a conversation with your development team. Lets get this party started already!
Got questions? E-mail the dev team, api@brax.io
Stay tuned for additional API functionality in the near future by starting a Brax free trial.

